Let me tell you a quick tale about a girl and some fabric.
Some number of weeks ago I stopped into Jo-Ann’s and found a bolt of 100% Rayon fabric with the most fantastic floral textile design I have ever come across. Normally I’m not one for tropical prints but the colors absolutely hypnotized me. Even though there wasn’t a use for it, I was about to buy a bunch of yards for who knows what. Then I saw that it was $14.99/yard. Nope! I don’t have a blog about being thrifty for nothing.
Fast forward three weeks and there I am back in Jo-Ann’s. After a bit of searching I found it again (serendipity?), but this time it was marked down to $9.99/yard. AND it was 40% off. Needless to say, I bought the rest of the bolt.
Start with a rectangle piece of fabric. Pick your length (do you want a knee skirt? a maxi?) and width (do you want it really flowy? Not so flowy?).
Step 1 (flowy skirts): Sew the two sides of the skirt together.
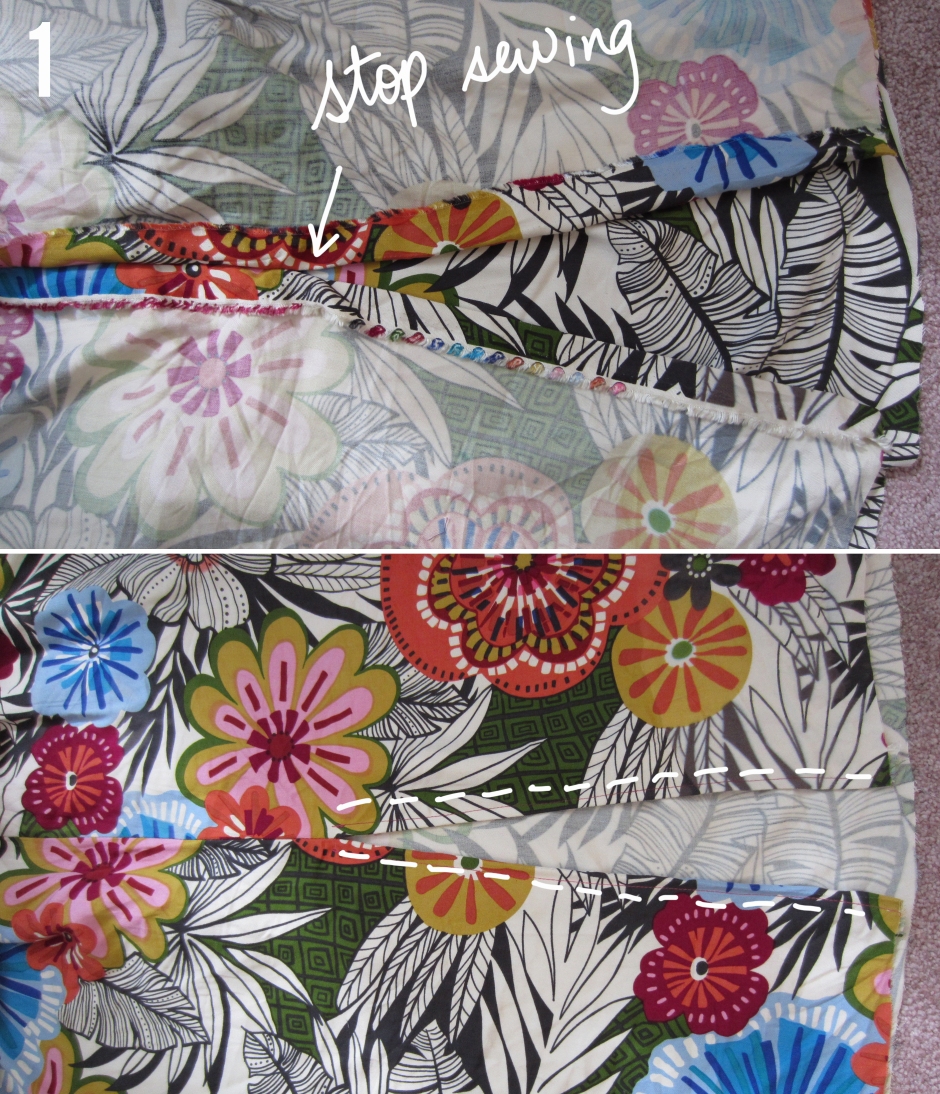
Step 1 (not so flowy skirts): Sew the two sides of the skirt together – but not all the way! If you’re going with “not so flowy” you’ll have to make a slit in order to walk around. The easiest way to do this is to leave the side seam unfinished. I stopped sewing about a foot away from the bottom (don’t forget to backstitch). Hem the unfinished edges separately (see stitch marks).
The major difference between this skirt and the sheer one from earlier is that I created a casing for the elastic this time. Which brings us to…
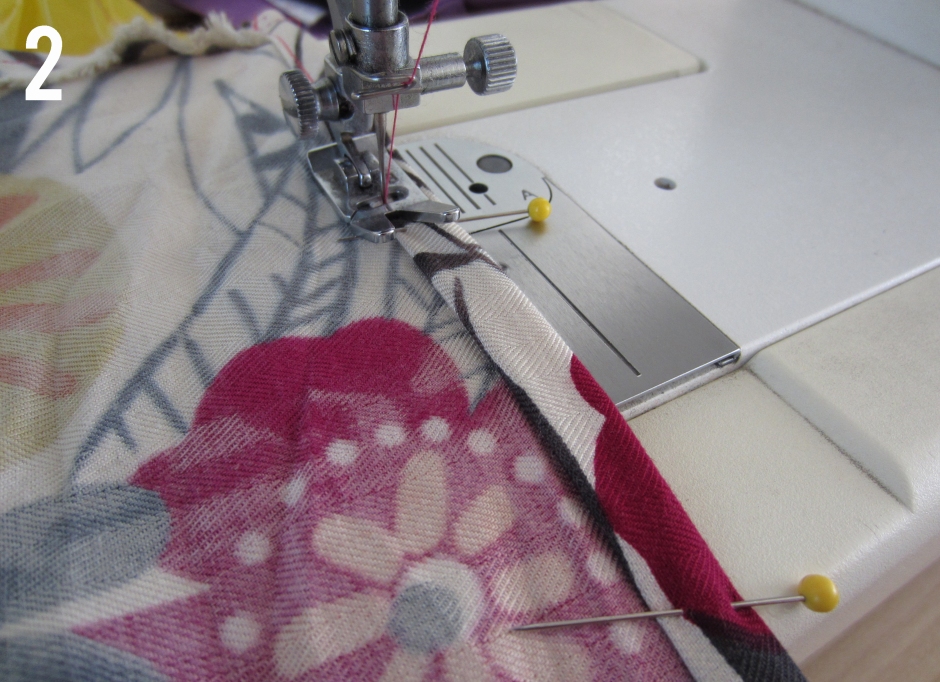
Step 3: Measure out the casing for the elastic. To do this, iron a small fold onto the top edge of the skirt. Then, fold it over until it is wide enough to encase the elastic.
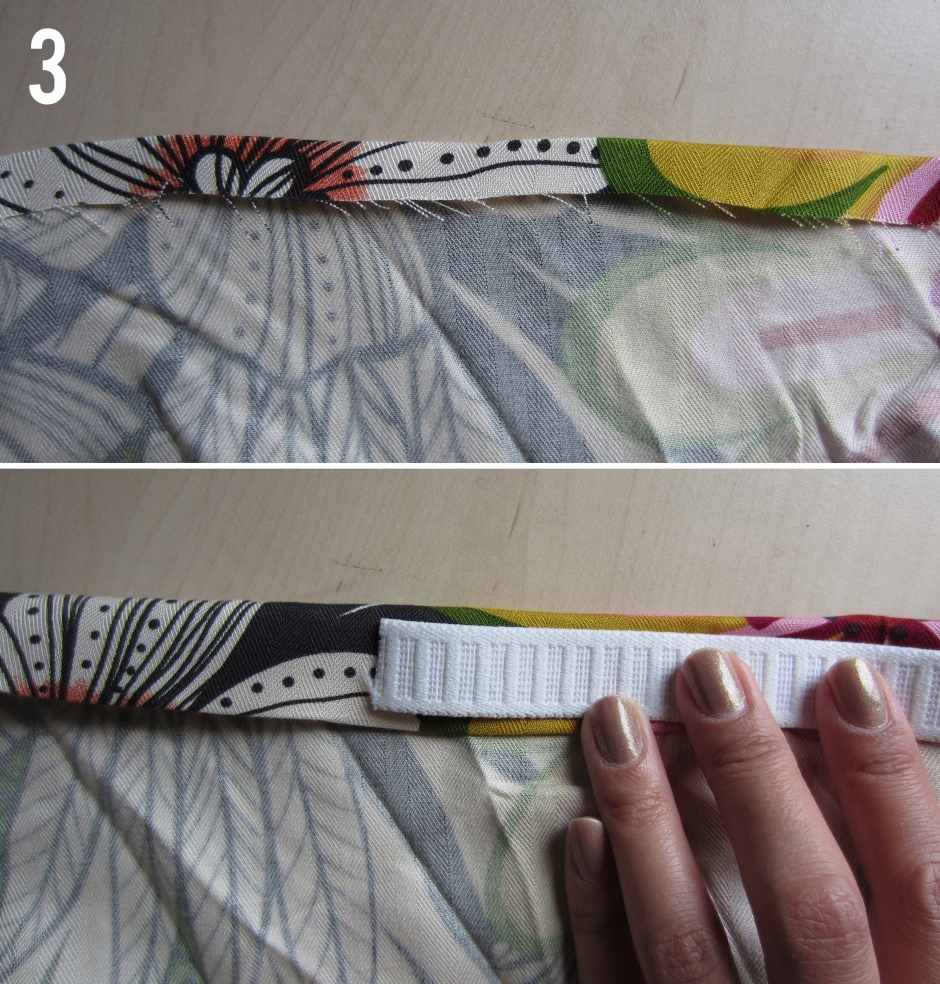
Step 4: Sew down the casing. Leave a few inches from the first and last stitch to create an opening in the casing.
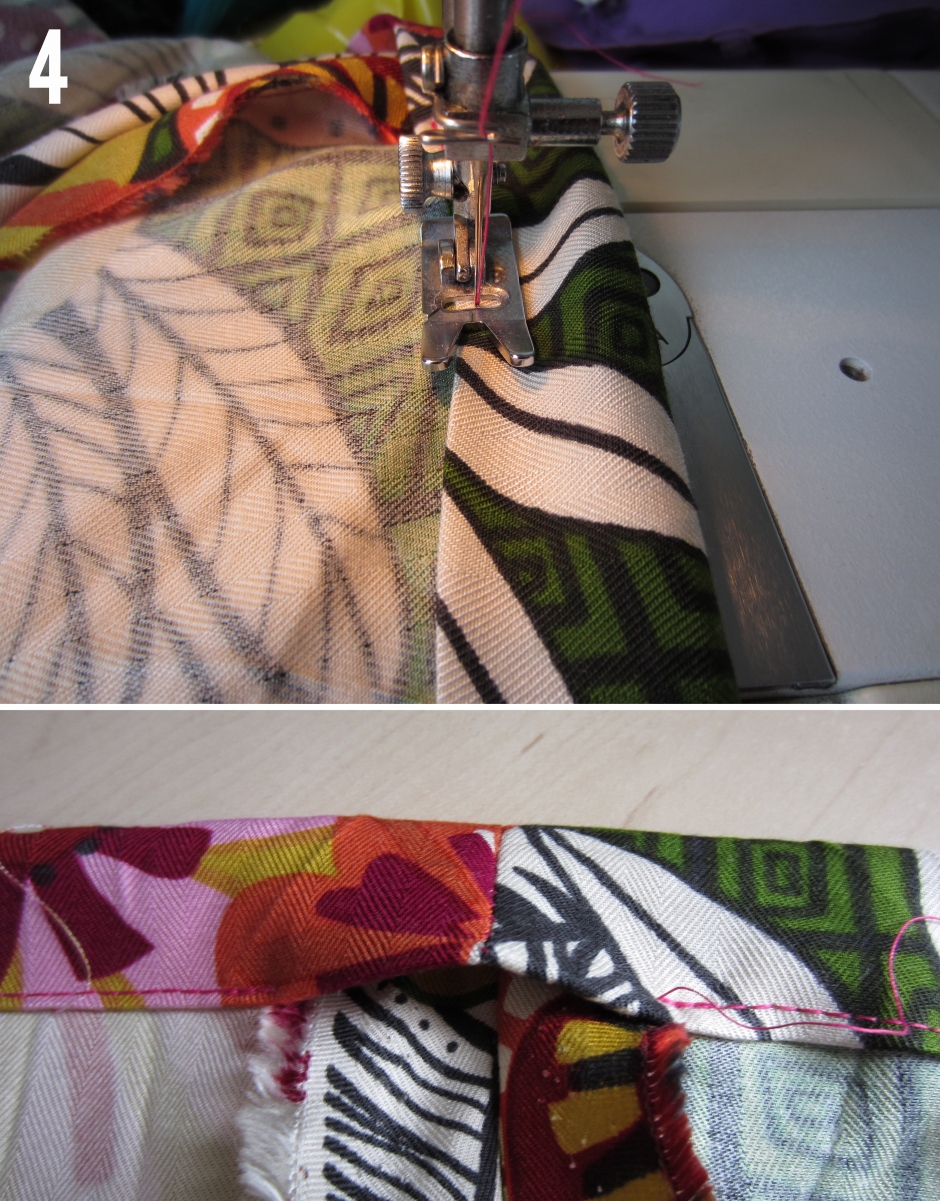
Step 5: Put the elastic in the casing. I like to snip a small hole into one end of the elastic and place a bobby pin through it. Using the bobby pin, put the elastic in one end of the opening you made.

Step 6: Snake the elastic through the casing. To prevent losing the elastic in the casing I safety pinned the end of it to the fabric.
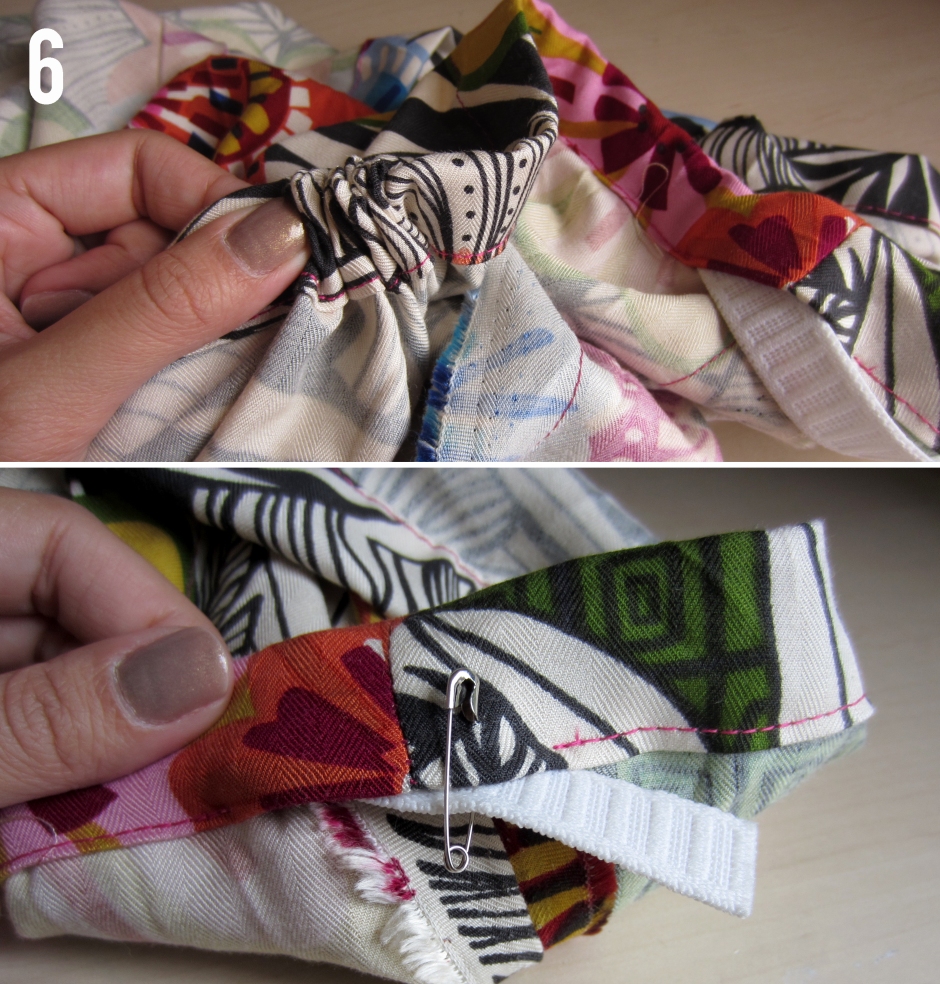
Step 7: Once you pull the elastic all the way through, sew it together.

Step 8: Sew the casing shut. Here’s a view from the right side of the skirt. You can see the backstitching on either end of the opening, but once you’re wearing it nobody will notice.

Helpful Hint: Sew the elastic to the fabric in just two or three places so that the elastic doesn’t twist around in its casing.
No getting pinched for me!
Thanks to Asia for taking pictures for me!


Wonderful Tutorial!
I’ve followed many many patterns over the years but have never taken the chance on going pattern less, it looks like I need to try now!
Thanks!
Wow, how beautiful. I used this method several years ago. Thanks for refreshing my memory.
love this skirt!!!
I recently refashioned an older dress using the method you did for sewing the elastic casing. You did a great job explaining it with great photos too! I’m gonna have to make the maxi skirt though!
Thanks, I’m glad it actually makes sense!
Pingback: Easy DIY New Skirt « Rubys N Purls
Love this skirt! This is actually the first type of skirt I ever made a few years ago after taking a class at JoAnn fabrics. I haven’t made a long flowy skirt yet–must try!
Pingback: Periwinkle Peplum & High Low Iridescence « letsgetthrifty.com
Thanks for the tutorial. It is definitely the easiest skirt I’ve ever attempted and for the first time, I really liked the end product! I’ve made 2 skirts from your tutorial already and I will definitely make some more. I love the big floral print on your skirt. They were what inspired me to make my very own version! Thanks and lots of love!
That’s awesome! Thanks for letting me know!
Just found this on Pinterst. Question; how much elastic band do you use? Do you use the exact lenth of you waist? Or more? Or less?
Hi Tamesha,
The elastic should be a few inches less than your actual waist so it will stay up. To measure it I would stretch the elastic around your waist to make sure it’s not too tight or too loose before cutting it.
This looks like a project I could actually do and the end result is so cute! I noticed that on the sheer skirt version of this tutorial, you sewed pleats into the top of the skirt before attaching it to the elastic to make it flowy. For this skirt, do you use the same amount of material as the sheer skirt and then just not sew pleats because the casing will kind of bunch around the fabric giving it that flowy look? (Do you know what I’m asking? Do I need to sew pleats? Or will it still be flow-y if I use the same amount of fabric as for the sheer skirt–double my waist + 5 inches)
Hi Samantha,
Yes, what you’re saying makes total sense! The answer is really up to your discretion. Using twice your waist + 5 inches as the width will work and no, you do NOT have to sew pleats. However, because of the heavier fabric I’m using in this post, I only did twice my waist. Hope that helps!
Tracy
This is perfect!!!
It (and you) look gorgeous!!! This is perfect thank you so much!
I have never had a Maxi skirt so this year I will be making one in summer of August 2013 and see whether I like these skirts to wear.
Hi! I love this skirt and I want to make it – can you tell me how to do this with a slit up one leg (like this, love the skirt, not the pricetag! http://www.vidasoleil.com/cover-ups/349-2013-acacia-morocco-silk-skirt.html). I live in the tropics and have access to awesome printed material like this 🙂 Thanks!
Hi there! In Step 1 of this tutorial I show you how to make a small slit. Simply use this side seam as your slit, and have it go as high up your leg as you like. See where it says “stop sewing” on the photo? Just don’t stop sewing until you get near the top 🙂
Absolutely beautiful. Will definitely try this. Do you have a tutorial turning a maxi dress into a skirt? I have an ill-fitted maxi skirt but I absolutely love the fabric so I want to refashion it. Please and thank you.
Hi Yama! Yes it will be posted soon!
I Just made a DIY maxi this weekend to wear to a concert. They are by far the easiest & cutest way to spruce up your wardrobe. I did add pockets, waistband and zip, but this is even easier. Great print too! #twothumbsup
Reblogged this on Naurah Insyirah and commented:
ahhh… something to do during the holidays!
Hi! for the waist part of the skirt is it suppose to be the exact measurement of your waist? Or more because you’re adding elastic?
Hi Caitlin,
It should be more than the width of your hips so you can slip it on, unless you’re adding a zipper.
Hi. this may be a dumb question, I am new at sewing. Why does the fabric need to be 2x your waist plus 5? And is the plus 5 sewing allowance? Did you finish the bottom? Beautiful skirt, thanks for the tutorial!
so if my waist (around) is 29 inches then I need fabric 58+5 wide? I understand the skirt needs to bunch up with the elastic and still be enough to be flowy and not so form fitting but it seems like it is so wide, I can’t wrap my mind around how that will work. Obviously it does because you did it beautifully but I cant picture it. Thanks!
Hello,
It does not necessarily have to be that measurement. I think that was stated in somebody else’s comment and I said it would be fine. As long as the width of the skirt can slip easily over your hips, it is up to you how wide to make it. it just depends on how flowy you want the skirt to be.
Have fun!
As I am reading your comments at the beginning…I’m thinking hey what’s the date! Maybe it’s at my Joann’s! LOVELY fabric….but too many years ago to think it could still be around! Thank you for the skirt ideas.